
Brushless Motor with C++: The Complete Guide
Introduction
Controlling brushless motors efficiently is vital in many applications, from drones to industrial automation. Brushless motors have several advantages over their brushed counterparts, including higher efficiency, longer lifespan, and lower maintenance. To fully harness these benefits, proper control is essential. This guide will introduce you to the intricacies of controlling brushless motors with C++ and help you understand its potential for your projects.
Basics of Brushless Motors
Understanding the basic principles of brushless motors is critical before diving into their control mechanisms. The main difference between brushed and brushless motors lies in their construction and operational principles.
Difference between Brushed and Brushless Motors
Brushless motors, as the name suggests, do not have brushes, unlike brushed motors. The absence of brushes contributes to their improved efficiency and reduced maintenance requirements. Check out our article on brushed motor vs brushless motor for an in-depth comparison.
Basics of Motor Control
In order to run a motor you need dedicated hardware that will handle the correct current to the Motor called Motor Controller, in this article we will take as a reference the SOLO Motor Controllers. The act of controlling a motor can be complex, with different approaches based on the application’s requirements. However, we try to summarize the basic knowledge concept.
Torque, Speed, and Position Control
The control of torque, speed, and position varies with the type of motor and its application. These controls allow precise management of the motor’s operation, making them vital for many applications. To understand more about this, refer to our post on torque, speed, position control.
Sensored vs Sensorless Control
In sensored control, sensors like Hall sensors or encoders are used to provide feedback about the motor’s state. On the other hand, sensorless control infers the motor’s state from electrical signals. Read our comparison of sensored vs sensorless control for a deeper understanding.
Open Loop vs Closed Loop Control
There are two main types of control systems: open-loop and closed-loop. In open-loop control, the controller operates independently of the motor’s actual state, while in closed-loop control, the controller adjusts its inputs based on feedback from the motor. Our blog post on open loop vs closed loop provides a comprehensive comparison.
Now that we’ve covered the basics, let’s dive into brushless motor control with C++. The next sections will guide you through setting up the environment, implementing control algorithms, and using libraries for control.
Environment and Wiring
The setup process depends on the type of motor and the hardware and software you are using. We will use for this Article:
- A Windows pc will be used to run all the example code.
- A SOLO will be used as a Motor controller, it will follow the command we provide from Windows handling the operation of the motor. SOLO support several protocol and environments in this case we will use the C++ Library to simplify the complexity of the code. Is interesting to mention also the Arduino, Python, and Simulink libraries.
- A Brushless DC Motor with the part number “DB56C036030-A” and the technical datasheet can be read here.

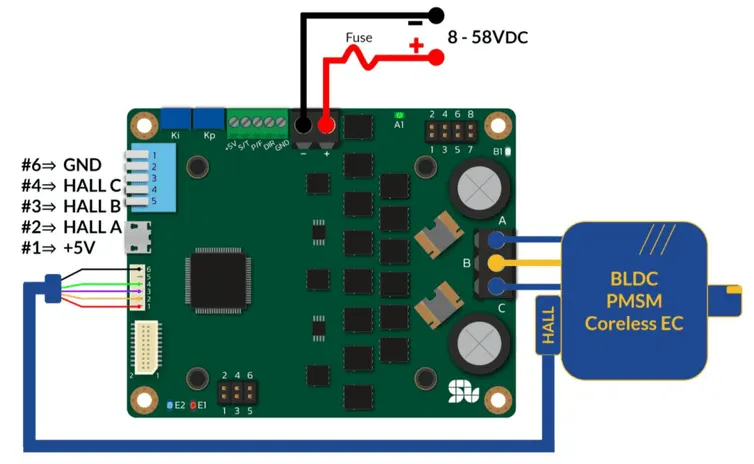
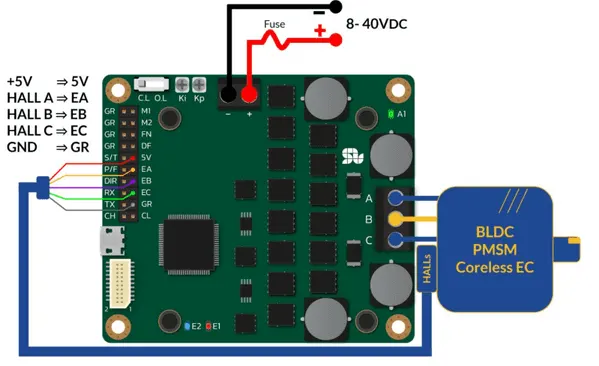
The following schematics are related to the proper wiring between the motor and the controller unit:
SOLO UNO wiring
SOLO MINI wiring
NOTE:
- The motor can change and this will require changing the configuration but the wiring will be very similar.
- In the schematic we show the Hall sensor wiring, it will be used in the sensor base example but is not needed in the sensorless example
- in this tutorial we will use the USB port of the motor controller.
Configure SOLO Motor Controller
In order to properly operate using the defined motor a series of information need to be given to the SOLO motor controller. We can use the Motion Terminal to do this activity fast (a guide here) or we can go by code, as this information are stored in the SOLO memory we suggest avoiding repeating this code multiple time.
Note
- the following code difference between the Serial and CANOpen are only lines #7 and #15
- you can download the SOLO cpp library to include in your example here (inside the library you can find examples too) After downloading it you need to include it in your project, a process that changes based on your IDE
SERIAL CONFIGURATION code
the next code is used when the SOLO controller is connected with USB to the PC
// The Motor used for Testings: DB56C036030-A
#include <iostream>
using std::cout;
using std::endl;

#include <conio.h>
#include "SOLOMotorControllersSerial.h"

//instanciate a SOLO object:
SOLOMotorControllers *solo;

int main(void) {
  //Initialize the SOLO object, COM3 is the USB port involved
  //Equivalent, avoiding the default parameter of SOLO Device Address:  solo = new SOLOMotorControllersSerial((char*)"COM3",0);
  solo = new SOLOMotorControllersSerial((char*)"COM3");

  //TRY CONNECT LOOP
  while(solo->CommunicationIsWorking() == false ){
    std::cout << "Solo connection failed. Retry" << std::endl;
    Sleep(500);
    solo->Connect();
  }
  std::cout << "Solo connected!" << std::endl;

  // Initial Configuration of the device and the Motor
  solo->SetOutputPwmFrequencyKhz(20);
  solo->SetCurrentLimit(10.0);
  solo->SetMotorPolesCounts(8);
  solo->SetCommandMode(SOLOMotorControllers::CommandMode::digital);
  solo->SetMotorType(SOLOMotorControllers::MotorType::bldcPmsm);

  //IMPORTANT uncomment the type of feedback you will use:
  //solo->SetFeedbackControlMode(SOLOMotorControllers::FeedbackControlMode::hallSensors); //hall sensor
  //solo->SetFeedbackControlMode(SOLOMotorControllers::FeedbackControlMode::sensorLess);  //sensor less

  //IMPORTANT uncomment the type of control you will use:
  //solo->SetControlMode(SOLOMotorControllers::ControlMode::speedMode);     //  speed Mode
  //solo->SetControlMode(SOLOMotorControllers::ControlMode::torqueMode);    //  torque Mode
  //solo->SetControlMode(SOLOMotorControllers::ControlMode::positionMode);  //  position Mode

  std::cout << "Solo confige end!" << std::endl;
}
CANOpen CONFIGURATION code
the next code is used when the SOLO controller connects with Kvaser to PC – CANOpen
// The Motor used for Testings: DB56C036030-A
#include <iostream>
using std::cout;
using std::endl;

#include <conio.h>
#include "SOLOMotorControllersKvaser.h"

//instanciate a SOLO object:
SOLOMotorControllers *solo;

int main(void) {
  //Initialize the SOLO object,
  //Equivalent, avoiding the default parameter of SOLO Device Address:  solo = new SOLOMotorControllersKvaser(0);
  solo = new SOLOMotorControllersKvaser();

  //TRY CONNECT LOOP
  while(solo->CommunicationIsWorking() == false ){
    std::cout << "Solo connection failed. Retry" << std::endl;
    Sleep(500);
    solo->Connect();
  }
  std::cout << "Solo connected!" << std::endl;

  // Initial Configuration of the device and the Motor
  solo->SetOutputPwmFrequencyKhz(20);
  solo->SetCurrentLimit(10.0);
  solo->SetMotorPolesCounts(8);
  solo->SetCommandMode(SOLOMotorControllers::CommandMode::digital);
  solo->SetMotorType(SOLOMotorControllers::MotorType::bldcPmsm);

  //IMPORTANT uncomment the type of feedback you will use:
  //solo->SetFeedbackControlMode(SOLOMotorControllers::FeedbackControlMode::hallSensors); //hall sensor
  //solo->SetFeedbackControlMode(SOLOMotorControllers::FeedbackControlMode::sensorLess);  //sensor less

  //IMPORTANT uncomment the type of control you will use:
  //solo->SetControlMode(SOLOMotorControllers::ControlMode::speedMode);     //  speed Mode
  //solo->SetControlMode(SOLOMotorControllers::ControlMode::torqueMode);    //  torque Mode
  //solo->SetControlMode(SOLOMotorControllers::ControlMode::positionMode);  //  position Mode

  std::cout << "Solo confige end!" << std::endl;
}
Hall Sensor Calibration
In case you want to use the sensor in your system you need to properly wire and calibrate the sensor.
If this is the first time you are connecting a motor to your SOLO, you need to make sure at least for one time, you have correctly calibrated the Hall sensors with correct connection of the Motor’s windings to ABC outputs of SOLO, to do that you need to read the article below and do the steps there at least one time, and as long as your Motor or the Hall sensors are the same or the Hall sensors mountings is not mechanically displaced with respect to the Motor, all the calibrated parameters will reside in long term memory of SOLO and they will be remembered after power recycling.
Speed Control of a BLDC in C++
Here is the code for the Serial application:
#include <iostream>
using std::cout;
using std::endl;

#include <conio.h>
#include "SOLOMotorControllersSerial.h"

//instanciate a SOLO object:
SOLOMotorControllers *solo;

// Motor Torque feedback
float actualMotorTorque = 0;

// Motor speed feedback
long actualMotorSpeed = 0;

// Motor position feedback
long actualMotorPosition = 0;

int main(void) {
  solo = new SOLOMotorControllersSerial((char*)"COM3");

  //Infinite Loop
  while(true){
    //set the Direction on C.C.W.
    solo->SetMotorDirection(SOLOMotorControllers::Direction::counterclockwise);
    //set an arbitrary Positive speed reference[RPM]
    solo->SetSpeedReference(1500);
    // wait till motor reaches to the reference
    Sleep(300);
    actualMotorSpeed = solo->GetSpeedFeedback();
    std::cout << "Measured Speed[RPM]: "<< actualMotorSpeed << std::endl;

    Sleep(3000);

    //set the Direction on C.W.
    solo->SetMotorDirection(SOLOMotorControllers::Direction::clockwise);
    //set an arbitrary Positive speed reference[RPM]
    solo->SetSpeedReference(900);
    // wait till motor reaches to the reference
    Sleep(300);
    actualMotorSpeed = solo->GetSpeedFeedback();
    std::cout << "Measured Speed[RPM]: "<< actualMotorSpeed << std::endl;

    Sleep(3000);
  }
  return 0;
}
this code will run the motor in 1 direction (line 26) at 1500 RPM (line 28) then after 3 seconds change direction (line 37) with a rotation of 900 rpm (line 39)
NOTE:
You need to be sure SOLO is configurated in speed mode, in the configuration the line used is:
solo->SetControlMode(SOLOMotorControllers::ControlMode::speedMode);
Speed Control of a BLDC using CANOpen protocol in C++
In this case, the previous code has to modify as follows:
line 6 with:
#include “SOLOMotorControllersKvaser.h”
line 21 with:
solo = new SOLOMotorControllersKvaser();
Speed Control of a BLDC using Hall sensor in C++
You need to be sure SOLO is configurated to use a hall sensor, in the proper configuration the line used is:
solo->SetFeedbackControlMode(SOLOMotorControllers::FeedbackControlMode::hallSensors);
Sensorless Speed Control of a BLDC in C++
You need to be sure SOLO is configurated to be sensorless, in the proper configuration the line used is:
solo->SetFeedbackControlMode(SOLOMotorControllers::FeedbackControlMode::sensorLess);
In this case, is not needed the calibration of the feedback and the wiring of it.
Torque Control of a BLDC in C++
Here is the code for the Serial application:
#include <iostream>
using std::cout;
using std::endl;

#include <conio.h>
#include "SOLOMotorControllersSerial.h"

//instanciate a SOLO object:
SOLOMotorControllers *solo;

// Motor Torque feedback
float actualMotorTorque = 0;

// Motor speed feedback
long actualMotorSpeed = 0;

// Motor position feedback
long actualMotorPosition = 0;

int main(void) {
  solo = new SOLOMotorControllersSerial((char*)"COM3");

  //Infinite Loop
  while(true){
    //set the Direction on C.C.W.
    solo->SetMotorDirection(SOLOMotorControllers::Direction::counterclockwise);
    //set an arbitrary Positive torque reference
    solo->SetTorqueReferenceIq(1.2);
    // wait till motor reaches to the reference
    Sleep(300);
    actualMotorTorque = solo->GetQuadratureCurrentIqFeedback();
    std::cout << "Measured Iq/Torque[A]: "<< actualMotorTorque << std::endl;

    Sleep(3000);

    //set the Direction on C.W.
    solo->SetMotorDirection(SOLOMotorControllers::Direction::clockwise);
    //set an arbitrary Positive torque reference
    solo->SetTorqueReferenceIq(0.8);
    // wait till motor reaches to the reference
    Sleep(300);
    actualMotorTorque = solo->GetQuadratureCurrentIqFeedback();
    std::cout << "Measured Iq/Torque[A]: "<< actualMotorTorque << std::endl;

    Sleep(3000);
  }
  return 0;
}
his code will run the motor in 1 direction (line 26) at 1.2 Amps (line 28) then after 3 seconds change direction (line 37) with 0.8 Amps (line 39)
NOTE:
You need to be sure SOLO is configurated in torque mode, in the configuration the line used is:
solo->SetControlMode(SOLOMotorControllers::ControlMode::torqueMode);
To define the Requested Torque [N.m] you can use this formula: Torque Reference [A] x Motor’s Torque constant[N.m/A]
Torque Control of a BLDC using CANOpen protocol in C++
In this case, the previous code has to modify as follows:
line 6 with:
#include “SOLOMotorControllersKvaser.h”
line 21 with:
solo = new SOLOMotorControllersKvaser();
Torque Control of a BLDC using Hall sensor in C++
You need to be sure SOLO is configurated to use a hall sensor, in the proper configuration the line used is:
solo->SetFeedbackControlMode(SOLOMotorControllers::FeedbackControlMode::hallSensors);
Sensorless Torque Control of a BLDC in C++
You need to be sure SOLO is configurated to be sensorless, in the proper configuration the line used is:
solo->SetFeedbackControlMode(SOLOMotorControllers::FeedbackControlMode::sensorLess);
In this case, is not needed the calibration of the feedback and the wiring of it.
Position Control of a BLDC in C++
Here is the code for the Serial application:
#include <iostream>
using std::cout;
using std::endl;

#include <conio.h>
#include "SOLOMotorControllersSerial.h"

//instanciate a SOLO object:
SOLOMotorControllers *solo;

// Motor position feedback
long actualMotorPosition = 0;

int main(void) {
  solo = new SOLOMotorControllersSerial((char*)"COM3");

  //Infinite Loop
  while(true){
    //set a desired Speed Limit for trajectory in RPM
    solo->SetSpeedLimit(900);
    // set a positive desired Position Reference in terms of pulses
    solo->SetPositionReference(+500);

    // wait till motor reaches to the reference
    Sleep(9000);
    actualMotorPosition = solo->GetPositionCountsFeedback();
    std::cout << "Number of Pulses passed: "<< actualMotorPosition << std::endl;

    //set a new desired Speed Limit for trajectory in RPM
    solo->SetSpeedLimit(1500);
    // set a negative desired Position Reference in terms of pulses
    solo->SetPositionReference(-3200);
    Sleep(1000);

    // wait till motor reaches to the reference
    Sleep(9000);
    actualMotorPosition = solo->GetPositionCountsFeedback();
    std::cout << "Number of Pulses passed: "<< actualMotorPosition << std::endl;
  }
  return 0;
}
this code will set a speed limit at 900 RPM (line 20) then change the position at 500 pulses (line 22) wait for 9 seconds then change the speed limit to 15100 RPM (line 30) and change the position to -3200 pulses (line 32)
NOTE:
You need to be sure SOLO is configurated in position mode, in the configuration the line used is:
solo->SetControlMode(SOLOMotorControllers::ControlMode::positionMode);
The position control needs accurate feedback from the motor, for this reason, sensorless is not suggested for this application.
Position Control of a BLDC using CANOpen protocol in C++
In this case, the previous code has to modify as follows:
line 6 with:
#include “SOLOMotorControllersKvaser.h”
line 15 with:
solo = new SOLOMotorControllersKvaser();
Position Control of a BLDC using Hall sensor in C++
You need to be sure SOLO is configurated to use a hall sensor, in the proper configuration the line used is:
solo->SetFeedbackControlMode(SOLOMotorControllers::FeedbackControlMode::hallSensors);
Conclusion
Brushless motor control with C++ can seem complex, but with the right knowledge and resources, it can be a highly rewarding skill. It’s a key driver in a variety of applications, from hobbyist projects to industrial machinery.
In this guide, we’ve taken a deep dive into the concepts of brushless motor control with C++. We’ve covered everything from the basics of brushless motors and motor control, right up to controlling brushless motors with C++.
We hope this guide has been a valuable resource on your journey to mastering brushless motor control with C++. Feel free to explore our blog for more articles on motor control and related topics. Happy coding!
Products in this article


